Building a Multi-Language Website Using Contentstack and Next.js i18n
Delivering content in a single language is no longer sufficient. Users expect personalized experiences that literally "speak their language" with cultural context or localization. This tutorial explores how to build a multilingual blog site using Contentstack and Next.js, a React framework that handles language-based routing out of the box. You'll learn to connect Next.js and Contentstack to build a blog supporting multiple languages.
Internationalization (i18n) refers to designing your application to adapt easily to different languages and regions, while localization (i10n) entails translating and adapting content for specific locales. Supporting multiple languages can be complex, but using the right tools streamlines the process. In this article, you will discover how to use Contentstack and Next.js to build a multi-lingual blog site.
What is Contentstack
Contentstack is a Digital Experience Platform (DXP) comprising a CMS and tools for personalization, automations, and AI. It decouples content storage from presentation, delivering it over APIs (REST or GraphQL). Its localization features allow you to define multiple locales and manage translations, delivering dynamic content based on language or region.
What is Next.js
Next.js is a React framework for fast, scalable web apps, offering server-side rendering (SSR), static site generation (SSG), file-based routing, and internationalization (i18n). It enables high performance and SEO while integrating seamlessly with Contentstack to render localized content efficiently.
Multi-language website tutorial
This tutorial explains how to connect Next.js and Contentstack to build a multilingual blog site.
1. Project setup
Prerequisites
Install Node v22 or greater
Create a Contentstack account
Basic Next.js knowledge is helpful but not required.
Initializing your Next.js app
Run the following command to create a new Next.js app:
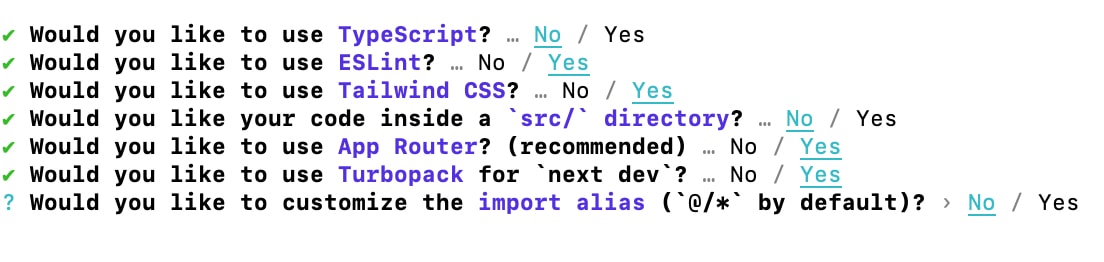
npx create-next-app@latest my-contentstack-blog && cd my-contentstack-blogDuring setup, follow the recommended options. The app's routes will live in the app folder, with page.js as the home page.
Setting up UI components
Create a components folder for shared UI elements, such as a Header component.
export default function Header() {
  return (
    <header classname="p-4 bg-gray-100">
      <h1 classname="text-2xl font-bold">Contentstack Blog</h1>
    </header>
  );
}
Now, update page.js .
import Header from "@/components/Header";

export default function Home() {
  return (
    <div classname="grid grid-rows-[20px_1fr_20px] items-center justify-items-center min-h-screen p-8 pb-20 gap-16 sm:p-20 font-[family-name:var(--font-geist-sans)]">
      <header>
        <div classname="flex flex-col items-center justify-center">
          <h1 classname="text-4xl font-bold mb-4">
            Welcome to Contentstack Blog
          </h1>

          <p classname="text-lg text-gray-700 mb-8">
            Discover the latest articles and insights from our team.
          </p>
        </div>

        <footer classname="text-center text-gray-500">
          © 2025 Contentstack. All rights reserved.
        </footer>
      </header>
    </div>
  );
}
Previewing the Home page
Run npm run dev and preview the home page at http://localhost:3000/.
2. Configuring localization in Contentstack
Creating a new stack
From your Contentstack dashboard, create a new stack as your project's content space.
Enabling multiple languages
Under Settings > Languages, add Spanish so you have both English and Spanish, with English as fallback.
IMAGE HERE
Creating an Environment
Create an environment (e.g., example-blog) to publish content to.
IMAGE HERE
3. Defining content types and add entries
Creating content types
Under Content Models, add a content type called Article (type: Multiple). Use fields title (default) and a multi-line content field. Save and start adding entries.
IMAGE HERE
Adding sample entries in multiple languages
Add an article in English and then use the language dropdown to add the Spanish version. Publish to make the localized entries available.
IMAGE HERE
4. Setting up i18n in Next.js
Using App router for localization
Create a new directory [lng] in app/ representing each locale. Move the home page and add a [blogId]/page.tsx file for articles:
- 📁 app/
  - 📁 [lng]/
    - 📄 page.tsx
    - 📁  [blogId]/
      - 📄 page.tsx
5. Connecting Contentstack with Next.js
You can use the Contentstack JavaScript SDK or REST API. Install the SDK:
npm install contentstackInitialize it in lib/contentstack.js with your API credentials (see documentation for guidance).
Handling locale mapping
Create a utility function to map Next.js locales (en, es) to Contentstack codes:
export function toContentstackLocale(locale) {
  return locale === "en" ? "en-us" : locale;
}
6. Fetching and display content
Write a helper fetchArticles that fetches articles by locale from Contentstack. Use this function in your homepage component to display article links. Update your frontend to route links by language and article ID.
Implementing middleware for language detection
To automatically detect and redirect users based on their browser language, create middleware.js to route them to the correct localized path.
Update Homepage to display Articles
Update app/page.js to display fetched articles for the current locale, linking to the detailed blog pages.

7. Creating Article pages
Make a fetchSingleArticle helper to get a specific article by ID and locale. Use this in [blogId]/page.js to render individual posts per language.
8. Preview and test application
Change the URL’s language code to see different localized content. Clicking an article link fetches the correct version.

You've now built a basic multilingual blog, set up localized routing and content in Contentstack, and configured Next.js for i18n.
Tips and best practices
Use fallback languages
Always use fallback content to prevent empty pages. Contentstack handles this automatically based on your fallback settings.
Handle untranslated content clearly
Flag untranslated entries for editors and display a "not available" message on the frontend when content is missing.
Structure content types for reusability
Use modular fields in Contentstack to minimize duplication and only translate necessary content.
SEO for localized routes
Reflect locale in your URLs (e.g., /en/article1, /es/article1). Use the hreflang tag to help search engines serve the right language.
Contentstack + Next.js = powerful multi-lingual applications
Combining Contentstack and Next.js delivers flexible, scalable, high-performance, multi-language applications with ease of management for global teams and editors.
About Contentstack
The Contentstack team specializes in product marketing, acquisition, retention, and digital strategies, offering solutions for leading global brands. In 2025, Contentstack was recognized as a Visionary in the Gartner Magic Quadrant for DXP and as a Leader in the Forrester Wave CMS report. Follow Contentstack on LinkedIn.
Frequently asked questions
How do I add additional languages beyond English and Spanish to my Contentstack project?
Go to Settings > Languages in Contentstack and add your desired languages. You can then localize content for each language and set a fallback for missing translations.
How does Next.js handle localization and routing for multiple languages?
Next.js uses its App Router and folder structure to easily create separate routes per locale. Each locale is represented by a directory (e.g., [lng]) and dynamic routing loads content for the correct language.
Why use the Contentstack SDK instead of REST API directly?
The Contentstack JavaScript SDK simplifies fetching and managing content, handling authentication and requests for you, while the REST API offers more control if needed.